New Pixel Compensation: no more Elephant foot effect with great build plate adhesion!
In this technical article, we share with you some research done in the last few days on a feature that will soon be available in Lychee Slicer: Pixel Compensation.
Jan Mrázek recently posted an excellent article on his blog with an interesting solution to the adhesion problems of 3D resin prints and the elephant foot effect. The whole document is filled with a lot of very well-explained information. We invite you to have a look at his article, as well as the other articles, they are all worth a look.
Our article focuses on the over-exposure of the first layers of 3D resin printing, which generates an expansion of the resin, destroying all the details and locally deforming the object’s shape. The over-exposure mainly allows improving the print adhesion on the build plate.
With this new feature, we offer a solution to solve this problem faced by users who print directly on the building board.
The Elephant Foot effect
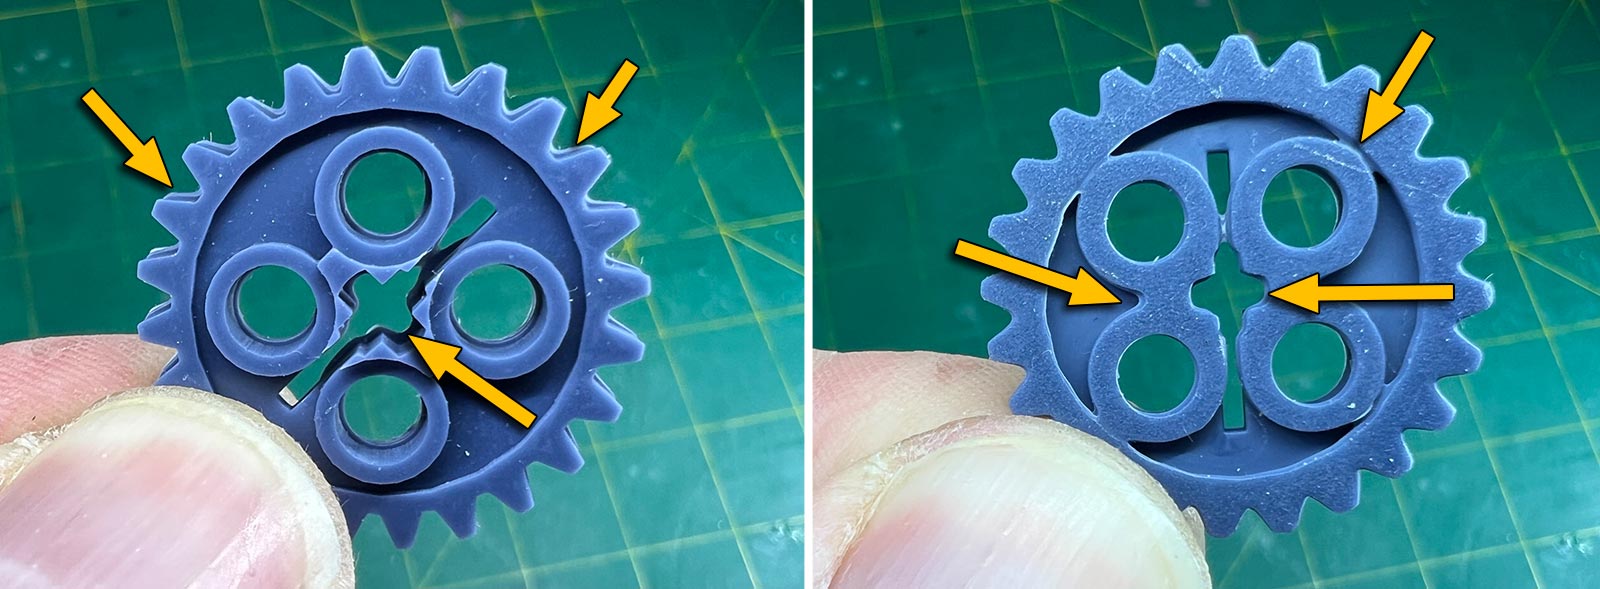
Here is an example of what over-exposure does to the first layers. Keep in mind that the original design on each side is supposed to be almost identical.
You can see the deformed lower layers as well as the offset with the regular layers in-between each tooth of the gear. On the right, we can see the underneath, i.e., the overexposed layers: the loss of quality is evident with more rounded shapes and merged parts. The purpose of the resin compensation is to reduce/limit this problem.
For information, all the photos are unedited, taken after the printing process, without additional UV curing.
The new Pixel Compensation: controlling locally the exposure
Lychee Slicer already offers an over-exposure compensation in the Pro version, which removes pixels on the outer contour to reduce the effect. This is a standard solution, but removing these pixels also means losing a lot of detail. Because of that, the model outline can be deformed.
We came up with an elegant solution: not removing the pixels at the edge of the shape but changing their exposure. They are not white but grey, allowing only partial UV light to pass through. The inner pixels remain white, which allows a solid adhesion to the build plate.
Because of these grey pixels, less UV Light will cure the resin. Therefore, the photopolymerization of the resin will be slower, drastically reducing the elephant foot effect.
Of course, inner white pixels will be overexposed. Still, as they are inside the model’s current layer, the expansion will not be a problem.
Above, on the left, the new pixel compensation has pixels on the boundaries with a 30% grey color and a 0.4mm thickness. The inner pixels remain white. On the right, is the traditional compensation that removes pixels to compensate for the resin expansion. Notice that the new feature avoids the loss of information and respects the slice information’s integrity.
The results: beyond expectation!
Our very first test is below. We entered values for the Pixel Compensation parameters that seemed consistent and logical… but we weren’t sure of the result. We were not disappointed!
Here is the result: a view from the top on the left side. The compensation has been set to grey pixels at 20% for the under-exposed layers. At first glance, it looks perfect!
In the middle, with a slightly different point of view, we can see a slight distortion at the inner corners of the teeth. However, we can ignore this minor distortion: this photo is an extreme close-up (compared with the size of the thumb), and you need a magnifying glass to see such deformation. Finally, you can see the piece’s base on the right side. It’s excellent and very close to the upper side, modulo the texture of the build plate, which is quite visible. It’s not perfect, though: the shape still lacks a little bit of sharpness.
It is crucial to consider an important point regarding the test result above: the exposure time was 45 seconds for these first 100 micron layers. Siraya Tech Navy Grey resin has been used with an Elegoo Mars 3. This resin requires a longer exposure time than classic resins. Going back to one of the key points of Jan Mrázek’s article, it is recommended to overexpose by 1.5 to 3 times the time of the regular layers (we prefer 3 to 4 times on our side). If we follow this rule and take the highest factor, we should have exposed 17.6 seconds (4.4s for regular layers x 4)… which is far from the 45 seconds of this test!
We opted for a longer time in our test above because manufacturers often recommend exposure times of the first layers longer than necessary to reduce the risk of failed prints. Applying a time of 17.6 (well, 18s…) seconds would likely have further improved the quality of these first layers by limiting this unnecessary over-exposure time.
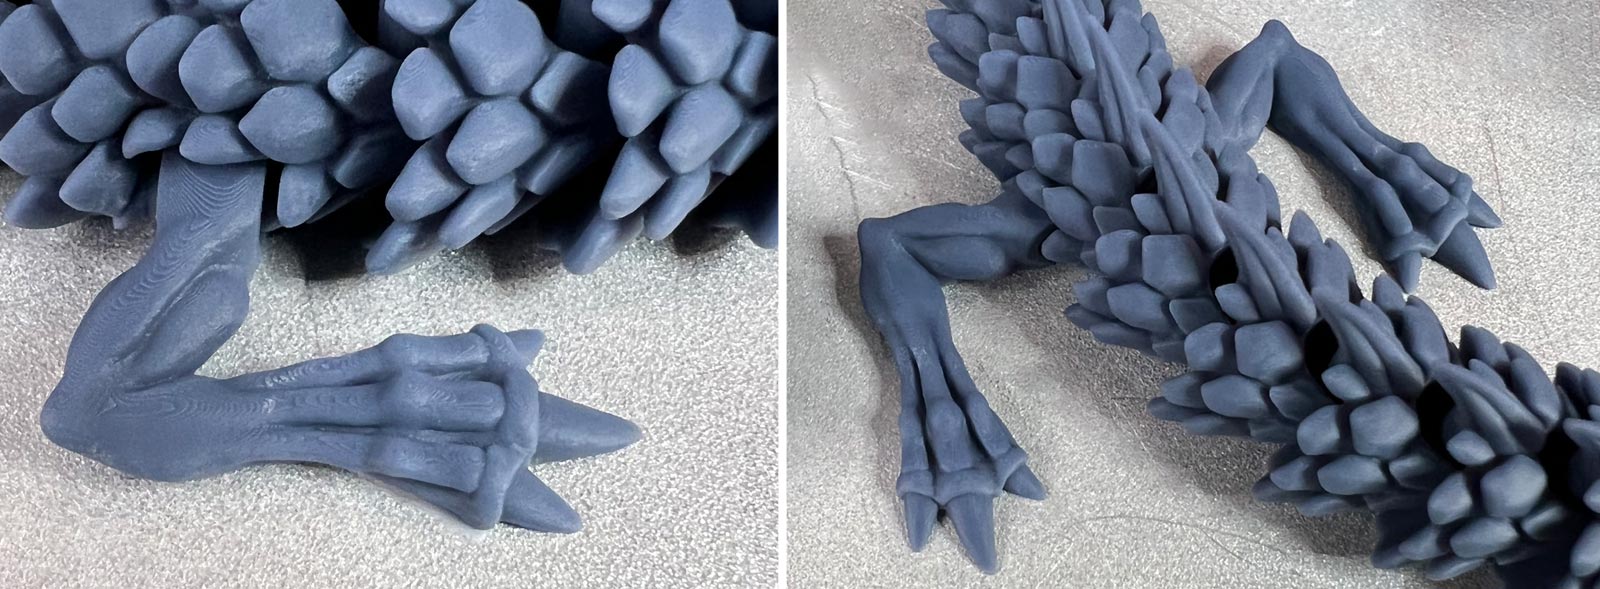
Jan Mrázek shows in his article the legs of the articulated dragon to illustrate his results. We printed the same model, and the result is perfect with -no- elephant foot and a very clean outline.
The picture above shows the print, cleaned and still on the build plate of the Elegoo Mars 3. Of course, there was no adhesion problem on the build plate, and removing the model was easy.
It is important to specify that we set the exposure time to 16 seconds for the bottom layers, not 45 seconds like our original tests.
Calibrations and tests are still needed
Standard compensation (removing pixels) requires a lot of trial and error to find the correct parameters for minimum distortion and acceptable quality. The only difficulty with the Pixel Compensation is finding the necessary grey intensity. Even this step is more accessible to implement than the classical compensation.
Above is an example where inadequate grey pixel compensation settings led to bad results: The grey was too dark and prevented the resin polymerization from being complete. White pixels have been perfectly cured.
It works with (almost) all 3D printers
Because this feature only changes the intensity of the pixels of the images locally, it is compatible with (almost) all resin 3D printers on the market. By the way, Transition Layers are also compatible with this Pixel Compensation tool!
Our tests were done with other resins and printers, on the photo above with the Elegoo Standard grey resin and the Elegoo Saturn.
On the left, with the Pixel Compensation, on the right, without any compensation. The print with the Pixel Compensation is much better but not yet perfect. This resin has a very high expansion rate. Still, we should get good results with some fine-tuning of the parameters, especially the initial exposure time, which should be reduced.
A last world
This new grey Pixel Compensation gives very (very!) encouraging results in quality and precision.
Of course, it will probably never offer the same results as conventional layers, but it seems that we are getting very close. We still have some experimentation to do, but we have reached a stage where the results do not make us want to use standard compensation again.
We would also like to thank Jan for his excellent publication. Reading it helped us to move towards this solution.
This feature is still under development and will be available in the Pro version in an incoming update.
We used the “Lego” pieces created by BadBrick and the articulated dragon by Mcgybeer to illustrate this article.
Lychee Slicer is now available for all users of the application, either as a free version or with a Pro subscription. Download the latest version from our download center or directly from the software.
Join our community now on our Discord server. It’s free and we are already several thousand to exchange and share around 3D printing with Lychee Slicer.

A wonderful product made with passion by


